(*日本語の記事はこちら)
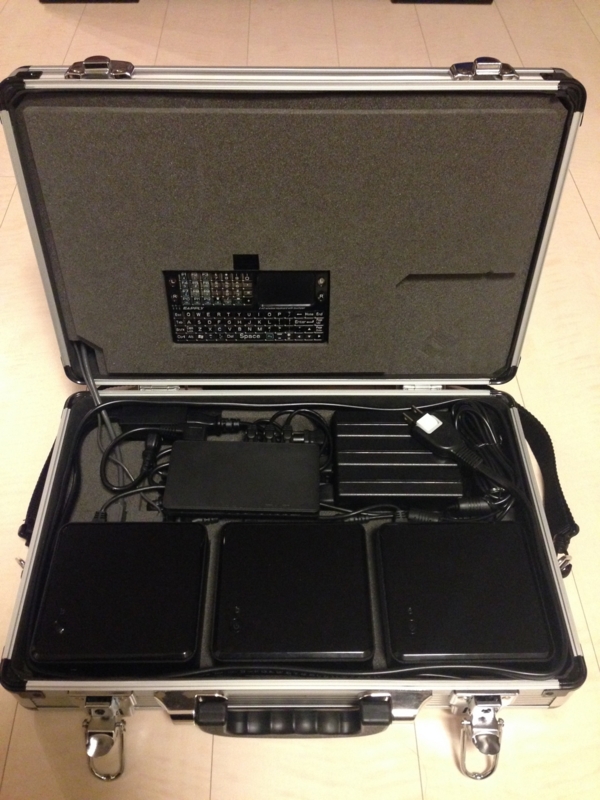
I have built a 3-nodes Hadoop Cluster which is packed in an aluminum case and easy to carry around. I use Intel's small form factor NUC PCs so that it is very compact. The size is 29 x 41.5 x 10 cm.

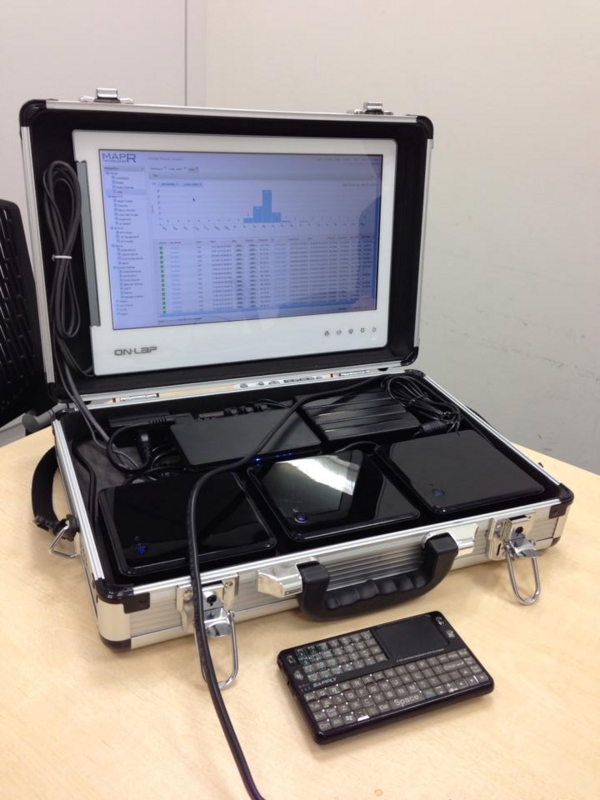
The specifications are as follows.
- 3 boxes of Intel NUC core i3 + 16GB memory + 128GB SSD
- Gigabit Ethernet + IEEE 802.11na Wifi router
- 13.3 inch HDMI-connected LCD monitor
- 2.4GHz wireless keyboard + touchpad
- A single power plug for the entire system
- CentOS 6.6 + MapR M7 4.0.1 + CDH 5.3
Since each node has 16GB memory, most of applications work without any problem. I usually bring the cluster to meeting rooms and show demos to my customers. It is really useful because I can start the demos in one or two minutes if only one power outlet is available. A wifi connection is also available, so you I show the demos with a large screen using a LCD projector by accessing it from your laptop.
I have built this for Hadoop, but it can be used for any distributed software systems. For example, you can definitely use it as a demo system for MongoDB, Cassandra, Redis, Riak, Solr, Elasticsearch, Spark, Storm and so on. In fact, I run HP Vertica and Elasticsearch together with MapR in this portable cluster since MapR's NFS feature enables easy integration with any native applications.
The full parts list and how to build are shown below. Let's make your original one!
Parts List
The following parts list is as of June 10, 2014 including price information. This article is written based on the cluster built using those parts.
| No. | Part Description | Unit Price | Amount |
|---|---|---|---|
| 01 | Intel DC3217IYE (NUC barebone kit) | 38,454 JPY | 3 |
| 02 | PLEXTOR PX-128M5M (128MB mSATA SSD) | 14,319 JPY | 3 |
| 03 | CFD W3N1600Q-8G (8GB DDR3-1600 SO-DIMM x 2) | 17,244 JPY | 3 |
| 04 | ELECOM LD-GPS/BK03 (0.3m CAT6 Gigabit LAN cable) | 211 JPY | 3 |
| 05 | Miyoshi MBA-2P3 (Power cable 2-pin/3-pin conversion adapter) | 402 JPY | 3 |
| 06 | FILCO FCC3M-04 (3-way splitter power cable) | 988 JPY | 1 |
| 07 | Logitec LAN-W300N/IGRB (Gigabit/11na wifi router) | 5,500 JPY | 1 |
| 08 | SANWA SUPPLY KB-DM2L (0.2m Power cable) | 600 JPY | 1 |
| 09 | GeChic On-LAP 1302/J (13.3 inch LCD) | 18,471 JPY | 1 |
| 10 | ELECOM T-FLC01-2220BK (2m Power cable) | 639 JPY | 1 |
| 11 | EAPPLY EBO-013 (2.4GHz Wireless keyboard) | 2,654 JPY | 1 |
| 12 | IRIS OYAMA AM-10 (Aluminum attache case) | 2,234 JPY | 1 |
| 13 | Inoac A8-101BK (Polyethylene foam 10x1000x1000) | 2,018 JPY | 1 |
| 14 | Kuraray 15RN Black (Velcro tape 25mm x 15cm) | 278 JPY | 2 |
| 15 | Cemedine AX-038 Super X Clear (Versatile adhesive 20ml) | 343 JPY | 1 |
Half a year later, some parts are no longer sold in store, so I created a new list as of December 29, 2014. Currently, it will cost about 230,000 JPY in total. Note that some descriptions about component location or configuration may need to be updated. In particular, the NUC box was replaced with its successor model D34010WYK, which requires 1.35V low voltage memory and has a mini HDMI and a mini DisplayPort instead of a HDMI port. For this reason, the models of the memory and the LCD have also changed.
I'm using the wireless keyboard shown as No. 11 on the list, which I happened to have, but it is probably difficult to find one now. In that case, you can use Rii mini X1 or iClever IC-RF01 as an alternative. The reason I chose a device with 2.4GHz wireless technology rather than with Bluetooth is that it is recognized as a USB legacy device and can be used for the BIOS settings on boot.
| No. | Part Description | Unit Price | Amount |
|---|---|---|---|
| 01 | Intel D34010WYK (NUC barebone kit) | 35,633 JPY | 3 |
| 02 | Transcend TS128GMSA370 (128MB mSATA SSD) | 7,980 JPY | 3 |
| 03 | CFD W3N1600PS-L8G (8GB DDR3-1600 SO-DIMM x 2) | 18,153 JPY | 3 |
| 04 | ELECOM LD-GPS/BK03 (0.3m CAT6 Gigabit LAN cable) | 406 JPY | 3 |
| 05 | Diatec YL-3114 (Power cable 2-pin/3-pin conversion adapter) | 494 JPY | 3 |
| 06 | FILCO FCC3M-04 (3-way splitter power cable) | 1,008 JPY | 1 |
| 07 | Logitec LAN-W300N/IGRB (Gigabit/11na Wifi router) | 6,000 JPY | 1 |
| 08 | SANWA SUPPLY KB-DM2L (0.2m Power cable) | 429 JPY | 1 |
| 09 | GeChic On-LAP 1302 for Mac/J (13.3 inch LCD) | 20,153 JPY | 1 |
| 10 | ELECOM T-FLC01-2220BK (2m Power cable) | 994 JPY | 1 |
| 11 | Rii mini X1 (2.4GHz Wireless keyboard) | 2,860 JPY | 1 |
| 12 | IRIS OYAMA AM-10 (Aluminum attache case) | 2,271 JPY | 1 |
| 13 | Inoac A8-101BK (Polyethylene foam 10x1000x1000) | 2,018 JPY | 1 |
| 14 | Kuraray 15RN Black (Velcro tape 25mm x 15cm) | 270 JPY | 2 |
| 15 | Cemedine AX-038 Super X Clear (Versatile adhesive 20ml) | 343 JPY | 1 |
Assembling Bereborn Kits
It is quite easy to assemble NUC bareborn kits. Machines can be completed simply by installing memory and SSD.
First, when you loosen the screws at the four corners of the bottom panel and uncover it, you will see two SO-DIMM slots (on the left in the picture below) and two mini PCI Express slots (on the right in the picture).
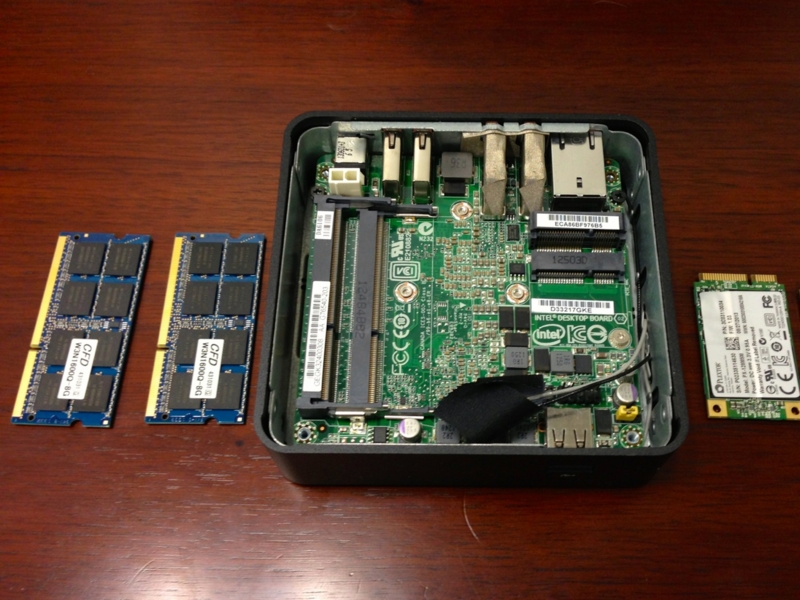
Insert two memory modules into SO-DIMM slots, and fix them until they get locked into the latches. Out of the two mini PCI Express slots, the lower slot is for the half-size wireless LAN module, and the upper slot is for the full-size mSATA compliant slot. A wireless LAN module is not used this time, so just insert an mSATA SSD into the upper slot and screw it down.
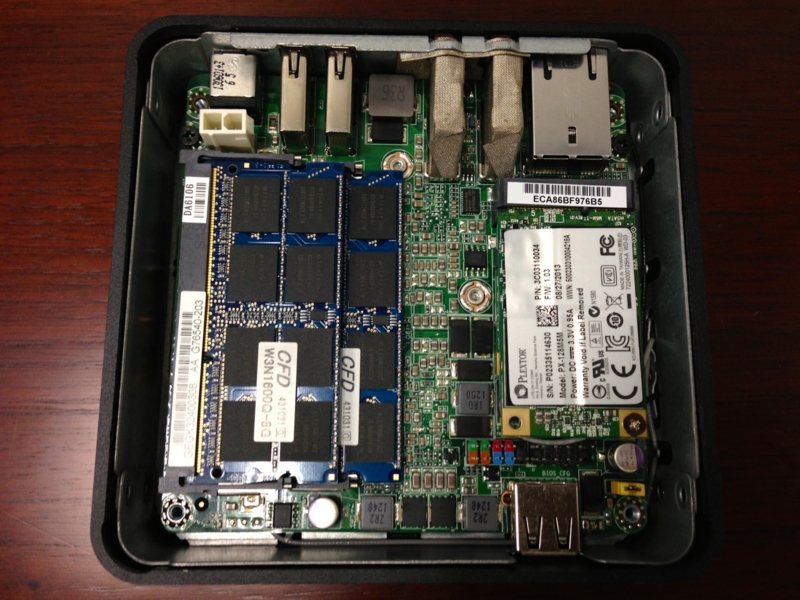
After that, attach the bottom panel again and screw it down to complete the box.
Cutting Out the Cushioning Foam for the Aluminum Case
In order to pack three machines, AC adapters, a Wifi router, a LCD monitor and cables into this small case, they are required to be suitably arranged. In addition, they need to be securely fastened not to be moved when carrying the case around.
First, cut a 1cm-thick polyethylene foam sheet using a utility knife as pictured below. I chose a 15 times expansion polyethylene foam called PE-light A8, which is firm enough, because it is supposed to be used as a cushioning foam to hold relatively heavy parts.
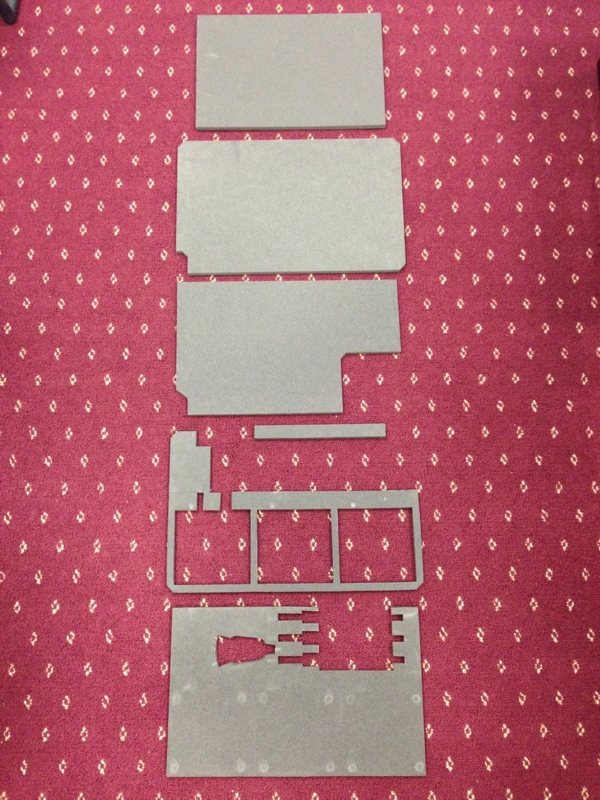
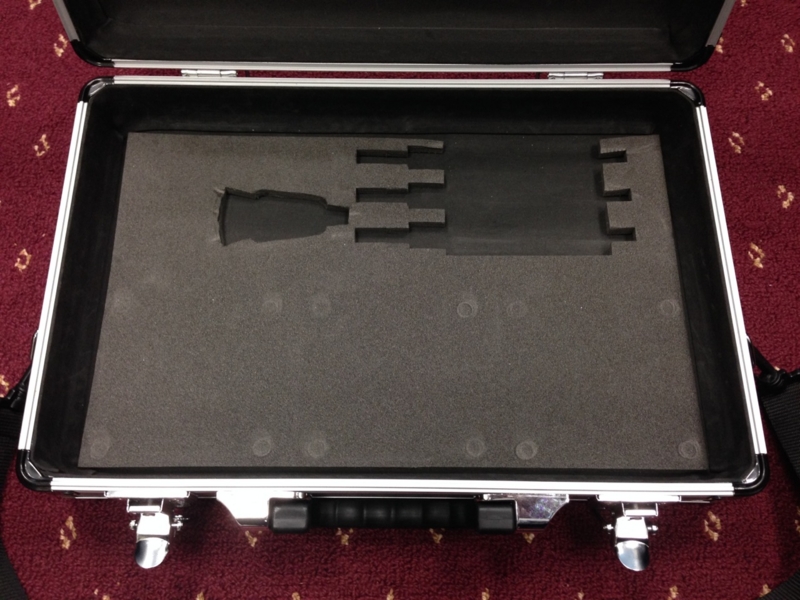
Next, attach the first layer on the bottom of the case and the second layer on top of it. This will act as a frame to hold three machines, AC adapters and cables.
I used Cemedine Super X Clear for the adhesion of the polyethylene foam sheets. Basically, polyethylene is a hard-to-bond material, but this sheet is textured and Super X is an elastic adhesive with flexibility, so there is no problem in adhesive property.
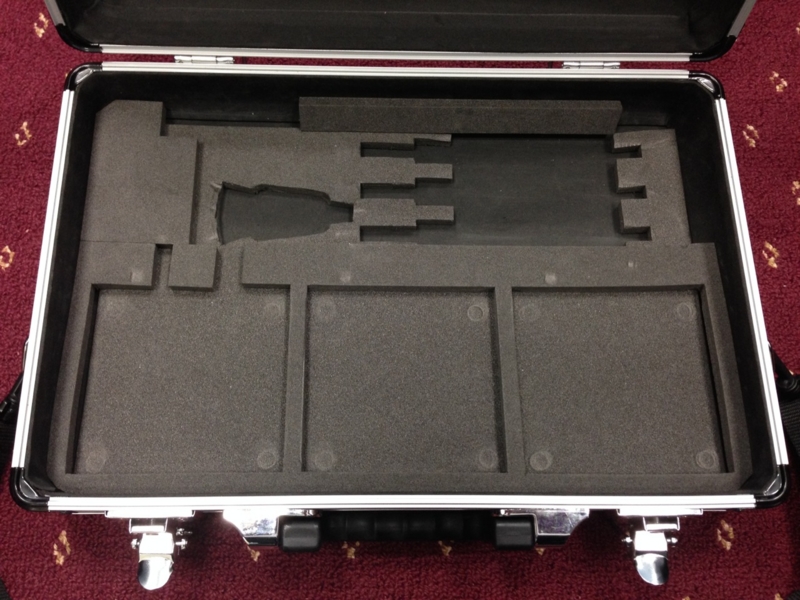
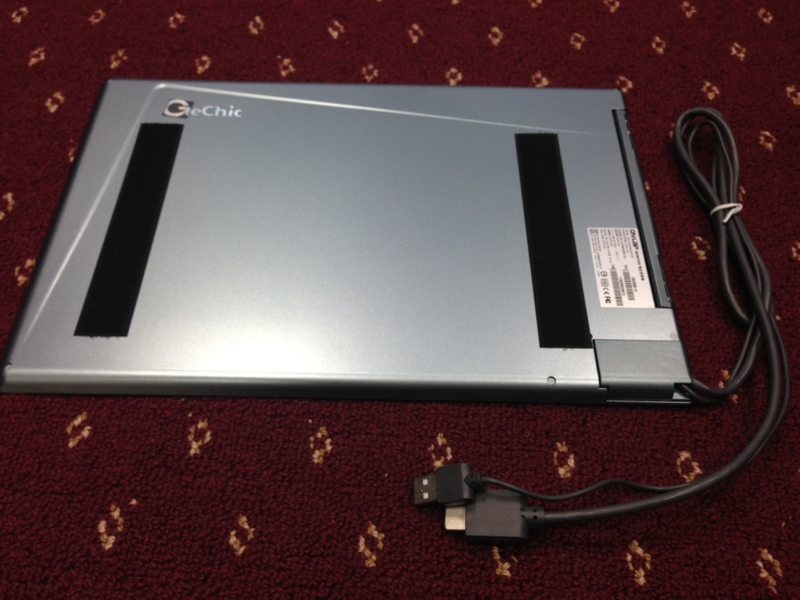
On the upper side, velcro tapes are attached to secure a LCD monitor. These velcro tapes are self-adhesive but not strong enough to be attached to the surface of the cushioning foam on the upper side, so an adhesive bond is used.
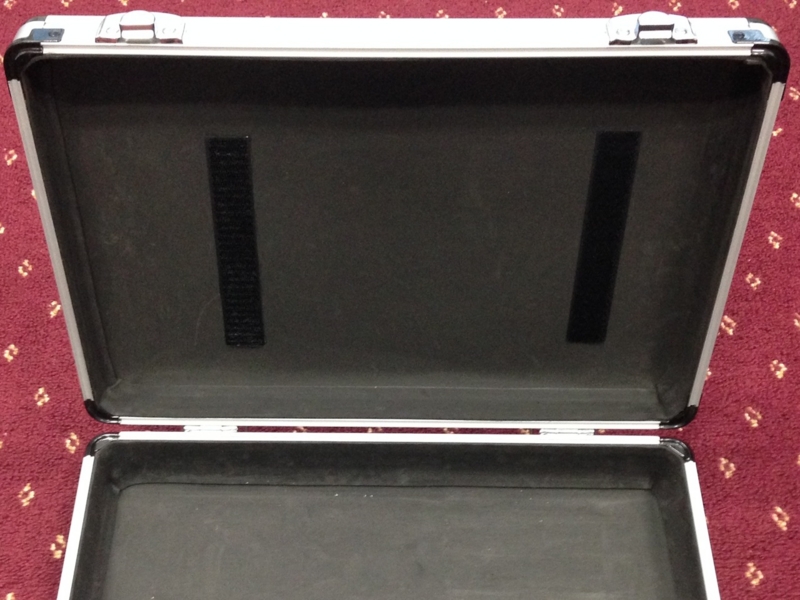
The corresponding velcro tapes are also attached to the back of the LCD monitor. It is smooth-faced in contrast, therefore the tapes can be put directly on it.
This LCD, GeChic On-LAP, is a product which is supposed to be attached to the back of a laptop PC and used as a secondary monitor, but I chose it because it is very thin and runs on USB bus power. The mounting hardware for attachment to a laptop is removed since it is unnecessary this time.
In addition, three layers of the sheets are glued together to form the cushioning pad that covers LCD monitor to protect its surface as well as holds machines and cables when the case is closed.
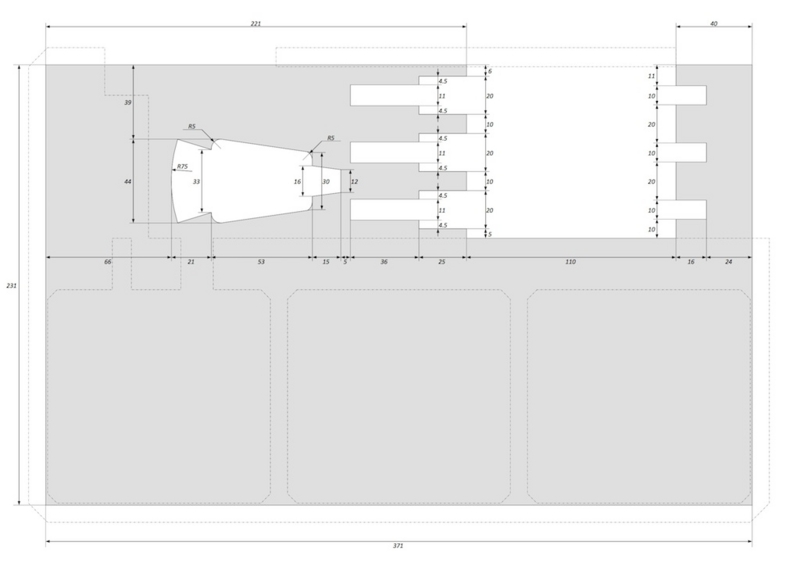
The picture below is the LCD monitor (upper) side. The cutout in the bottom right corner is a space for monitor cables.

Turning it over, you will see the machine (lower) side. The cutout of the double layer depth in the center is a storage space for a keyboard, and that of single layer depth at the bottom right is for a power plug.
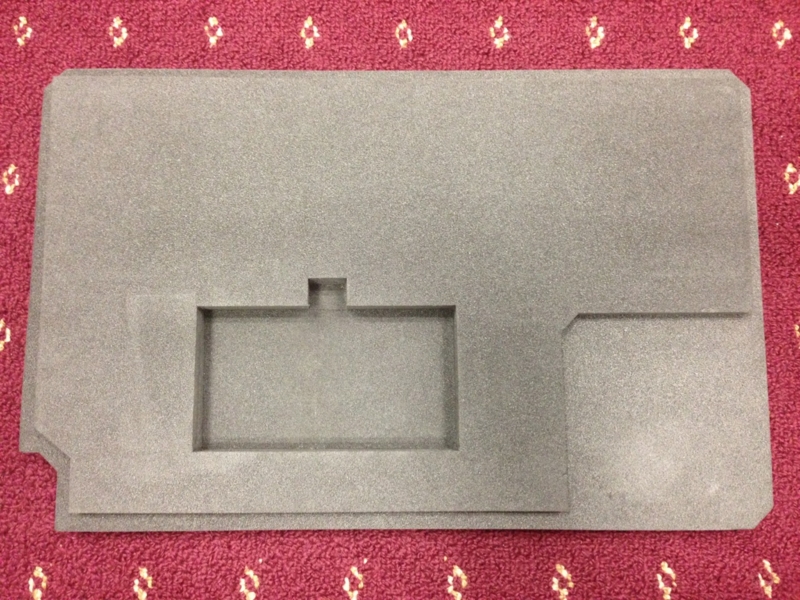
By the way, for those who don't want to struggle to measure and cut those complex shapes, the drawing is ready for download as a PDF.
Link to the PDF of the drawing
Layout of Components and Wiring
Arrange all the components step by step. Place three machines, put the AC adapters side by side and bind cables compactly. Since NUC's AC adapter has a 3-pin plug, they are connected via the 3-pin-to-2-pin conversion adapters to the 3 way splitter cable, and finally connected to the 2-way power strip. Then, the HDMI cable and the USB cable for power supply from the LCD monitor are plugged to the leftmost machine. The USB dongle for the wireless keyboard is also plugged into it.
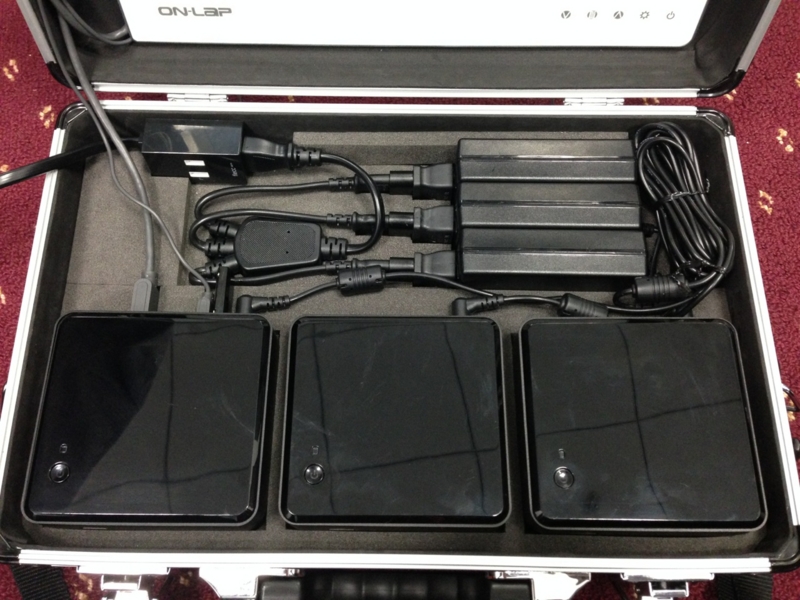
Next, plug the L-type 2-pin power plug into the Wifi router and the other end into the remaining outlet of the power strip. And, connect the Ethernet port on each machine and the LAN-side port of the router using a LAN cable. The Wifi router is not fixed in place, but it fits into the space above the power split cable. There is no other Wifi router out in the market like this small-sized, self-powered Gigabit Ethernet router, so I was afraid of its end of sale... actually, it has already reached the end of sale. If you want to make this, find and get it as soon as possible!
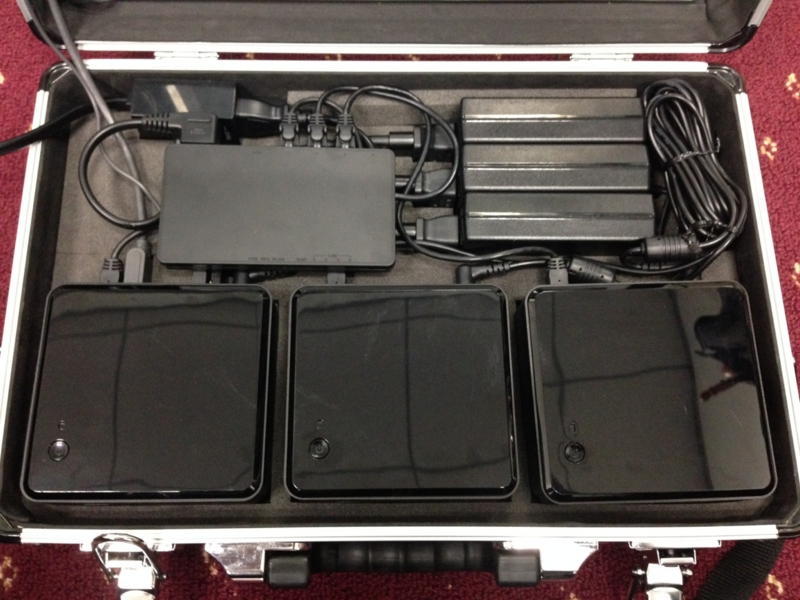
These are all the steps to assemble the system. Now put the cushioning pad on top of the LCD monitor and place the keyboard in it. The power strip cable needs to be laid out about two rounds along the edge of the case, and place the plug to the location as shown below. By arranging this way, the cushioning forms tightly hold the machines and cables and they will never be moved around once the case is closed.
Wifi Router Configuration
Before installing the OS, configure the Wifi router to get the network environment ready. First, plug the power cable into a wall outlet to turn the Wifi router on. The default SSID and pre-shared key for Wifi connection are described on the wireless encryption key sticker included in the product package, so enter them to establish a connection. The default IP address for the Wifi router is '192.168.2.1'. Open a web browser, go to 'http://192.168.2.1' and login with user name 'admin', password 'admin'.
In the administration screen, edit the following settings for the Portable Hadoop Cluster, and leave everything else as default. The SSID and pre-shared key can be any values you like. Regarding IP address for the cluster, use the default subnet of 192.168.2.0/24, but change the IP address of the router to 192.168.2.254, reserve 192.168.2.1 to 192.168.2.9 for the cluster nodes and other purpose as fixed addresses, and assign the remaining 192.168.2.10 to 192.168.2.253 for DHCP.
| Menu Category | Menu Item | Item | Value |
|---|---|---|---|
| Wireless Settings | Basic Settings | SSID | mapr-demo |
| Multi SSID | Uncheck 'Valid' to disable it | ||
| Security Settings | Shared Key | Any passphrase | |
| Wired Settings | LAN-Side Settings | Device's IP Address | 192.168.2.254 |
| Default Gateway | 192.168.2.254 | ||
| DHCP Client Range | 192.168.2.10 - 192.168.2.253 |
Click 'Apply' button after completion of editing, then the Wifi router will restart. Lastly, plug the network cable with Internet access into the WAN-side port of the router, and move on to the next step.
CentOS Installation
The next step is software installation and configuration. Since NUCs have no DVD drive, use a USB flash drive for booting and perform network installation. Use a Windows PC to create a bootable image for installation on a USB flash drive.
First, download UNetbootin for Windows and CentOS 6.6 minimal image to a Windows PC.
- UNetbootin for Windows
http://unetbootin.sourceforge.net - CentOS DVD image (Download CentOS-6.6-x86_64-minimal.iso)
http://ftp.riken.jp/Linux/centos/6/isos/x86_64/
Plug a USB flush drive into the Windows PC and launch UNetbootin. Select 'Diskimage' and specify CentOS-6.6-x86_64-minimal.iso that was downloaded in the previous step. Select 'USB Drive' in the Type field, specify the USB flush drive in the Drive field, and then click 'OK'. It takes a while to finish the process, and eject the USB flush drive when the boot image is created.
Next, install the OS on each machine. Since a monitor and keyboard are required, set up one by one by plugging the HDMI cable and the USB dongle for the wireless keyboard in and out.
Plug the USB flash drive into a NUC, and press the power button on the top panel to boot the machine. I only remember vaguely, but the USB flash drive should be recognized as a boot device because the SSD is empty, and installation process will start. (If it doesn't start, hold F2 key during boot-up and select the USB flash drive in the [Boot] menu.)
I'm not going into detail about the CentOS installation process, but I will list a few important points as follows.
- In the 'Installation Method' screen, select 'URL' as an installation media type. In the 'Configure TCP/IP' screen, proceed with the default settings of DHCP. In the 'URL Setup' screen, enter 'http://ftp.riken.jp/Linux/centos/6/os/x86_64/' in the topmost field.
- In the host name setting screen, enter the host name 'node1', 'node2' and 'node3', respectively from left to right. In addition, click the 'Configure Network' button at the bottom left of the same screen, select the device 'System eth0' in the 'Wired' tab and go to 'Edit'. Select 'Manual' in the Method drop down menu in the 'IPv4 Settings' tab. Add the address '192.168.2.1', '192.168.2.2' and '192.168.2.3', respectively from left to right, with the netmask '24' and the gateway '192.168.2.254', and enter the DNS server '192.168.2.254'.
- In the installation type selection screen, select 'Create Custom Layout' and create the layout as follows in the partition edit screen. Assign standard partitions and don't use LVM.
Device Size Mount Point Type /dev/sda1 200MB /boot/efi EFI /dev/sda2 200MB /boot ext4 /dev/sda3 58804MB / ext4 /dev/sda4 58804MB /mapr ext4 /dev/sda5 4095MB swap - In the installation software selection screen, select 'Desktop'.
When the installation completes, machines will restart. In the post installation setup screen after restart, 'Create User' is unnecessary for the moment, so proceed with blank. In the 'Date and Time', check 'Synchronize date and time over the network'. 'Kdump' is unnecessary. These are all the steps to setup the OS.
Miscellaneous OS Configuration
As a preparation for building the Hadoop Cluster, make miscellaneous OS configuration settings. Perform the following steps on each node.
Edit '/etc/sysconfig/i18n' as follows to set the system language to 'en_US.UTF-8'.
LANG="en_US.UTF-8"
Edit the following line in '/etc/sysconfig/selinux' to disable SELinux.
SELINUX=disabled
Now, restart the machine. This will disable SELinux, but some files are still labeled with a SELinux context, so delete such information with the following command.
# find / -print0 | xargs -r0 setfattr -x security.selinux 2>/dev/null
Add the following lines to '/etc/sysctl.conf'.
vm.overcommit_memory=0
net.ipv4.tcp_retries2=5
Run the following command to reflect the changes.
# sysctl -p
Edit '/etc/hosts' as follows.
127.0.0.1       localhost
192.168.2.1     node1
192.168.2.2     node2
192.168.2.3     node3
Run the following commands to stop the iptables services and disable them on startup.
# service iptables stop
# service ip6tables stop
# chkconfig iptables off
# chkconfig ip6tables off
Edit '/etc/ntp.conf' to configure NTP so that the clocks of three nodes are synchronized. The factory default settings are to synchronize with the NTP servers on the Internet. However, this Portable Hadoop Cluster doesn't always have the Internet connection, so configure every node to be synchronized with a local clock on node1.
On node1, edit the following lines in '/etc/ntp.conf'. Comment out the default server setting, and specify '127.127.1.0', which stands for host's local clock.
nrestrict 192.168.2.0 mask 255.255.255.0 nomodify notrap
server 127.127.1.0
#server 0.centos.pool.ntp.org
#server 1.centos.pool.ntp.org
#server 2.centos.pool.ntp.org
On node2 and node3, edit the following lines in '/etc/ntp.conf'. The reference source is set to node1.
server node1
#server 0.centos.pool.ntp.org
#server 1.centos.pool.ntp.org
#server 2.centos.pool.ntp.org
Restart the NTP service with the following command.
# service ntpd restart
Create the MapR system user and group with the following commands. Set the password of your choice.
# groupadd mapr -g 500
# useradd mapr -u 500 -g 500
# passwd mapr
It is convenient if the root user and the mapr user can login to other nodes via ssh without password. The following commands set up a password-less ssh login.
# ssh-keygen -t rsa -N '' -f ~/.ssh/id_rsa
# for host in node1 node2 node3; do ssh-copy-id $host; done
# su - mapr
$ ssh-keygen -t rsa -N '' -f ~/.ssh/id_rsa
$ for host in node1 node2 node3; do ssh-copy-id $host; done
$ exit
Install OpenJDK from the yum repository with the following command.
# yum install java-1.7.0-openjdk-devel
In the installation process, the partition '/dev/sda4' was created for MapR and mounted on '/mapr'. Since MapR accesses block devices directly, unmount this file system.
# umount /mapr
In addition, edit '/etc/fstab' to remove the line of /dev/sda4 so as not to be mounted on startup.
MapR Installation
The last step is the installation of the MapR distribution for Hadoop. Perform the following steps on each node.
First, create '/etc/yum.repos.d/maprtech.repo' to configure the MapR yum repository.
[maprtech]
name=MapR Technologies
baseurl=http://package.mapr.com/releases/v4.0.1/redhat/
enabled=1
gpgcheck=0
protect=1

[maprecosystem]
name=MapR Technologies
baseurl=http://package.mapr.com/releases/ecosystem-4.x/redhat
enabled=1
gpgcheck=0
protect=1
Since some EPEL packages are also required, run the following commands to configure the EPEL repository.
# wget http://download.fedoraproject.org/pub/epel/6/x86_64/epel-release-6-8.noarch.rpm
# yum localinstall epel-release-6-8.noarch.rpm
Next, install MapR packages. For MapR 4.x, both MapReduce v1 and v2 (YARN) applications can run at the same time, but they can not share the same memory space. So, select either v1 or v2 for this cluster to use a limited 16GB memory efficiently.
Run the following commands for the MapReduce v1 configuration.
# yum install mapr-cldb mapr-core mapr-core-internal mapr-fileserver \
mapr-hadoop-core mapr-jobtracker mapr-mapreduce1 mapr-nfs mapr-tasktracker \
mapr-webserver mapr-zk-internal mapr-zookeeper
Run the following commands for the MapReduce v2 configuration. Since the History Server can be configured only on a single node, the mapr-historyserver package is installed only on node1.
# yum install mapr-cldb mapr-core mapr-core-internal mapr-fileserver \
mapr-hadoop-core mapr-historyserver mapr-mapreduce2 mapr-nfs mapr-nodemanager \
mapr-resourcemanager mapr-webserver mapr-zk-internal mapr-zookeeper
The following command will create the file that specifies the partition for the MapR data.
# echo "/dev/sda4" > disks.txt
The following command will perform initialization and configuration of MapR. After running this command, the appropriate services will start automatically. For MapReduce v1 configuration:
# /opt/mapr/server/configure.sh -N cluster1 -C node1,node2,node3 \
-Z node1,node2,node3 -F disks.txt
For MapReduce v2 configuration:
# /opt/mapr/server/configure.sh -N cluster1 -C node1,node2,node3 \
-Z node1,node2,node3 -RM node1,node2,node3 -HS node1 -F disks.txt
Once these configurations have been completed on all the three nodes, the MapR cluster will become active in a few minutes. However, there is the issue in MapR 4.0.1 that users of some browser may lose the ability to access MapR via HTTPS because recent version of them have removed support for older certificate cipher algorithms. Run the following commands on each node to install the patch for this issue. The last command will restart the Web servers, and the web interface will become active in a few minutes.
# wget http://package.mapr.com/scripts/mcs/fixssl
# chmod 755 fixssl
# ./fixssl
Open a web browser and go to 'http://192.168.2.1:8443', then the MapR Control System screen will be shown. Login to it with the user name 'mapr' and the password that you have set when creating the user.
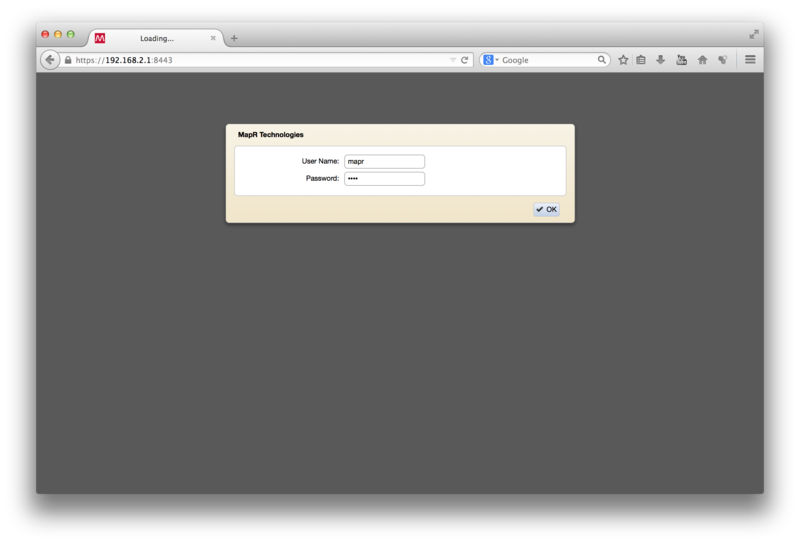

Register the MapR cluster via Web and obtain a license key. By factory default, a Base License is applied, but if a free perpetual M3 license or a free 30-day trial M5 license is applied, the NFS access, high-availability and data management features such as snapshot will be enabled.
Click 'Manage Licenses' at the top right of the MapR Control System screen, and click 'Add Licenses via Web' button in the dialog appeared. You will be asked if going to MapR's web site, then click 'OK' to proceed. Once a form for user registration is filled out and submitted on the web site, select either a M3 or M5 license, and a license will be published. Go back to the MapR Control System screen, and click 'Add Licenses via Web' button in 'Manage Licenses' dialog to apply the obtained license.
Now, run a sample MapReduce job. This is a sample MapReduce job which calculates pi. For MapReduce v1:
$ hadoop -classic jar /opt/mapr/hadoop/hadoop-0.20.2/hadoop-0.20.2-dev-examples.jar pi 10 10000
For MapReduce v2:
$ hadoop -yarn jar /opt/mapr/hadoop/hadoop-2.4.1/share/hadoop/mapreduce/hadoop-mapreduce-examples-2.4.1-mapr-1408.jar pi 10 10000
Lastly, add the settings that are specific to this Portable Hadoop Cluster. In the MapR's default configuration, relatively large memory is assigned to each MapR daemon process, but the machines in this cluster have a relatively small, 16GB memory, so edit the following lines in '/opt/mapr/conf/warden.conf' on each node to minimize the memory assigned so that much more memory will be assigned to MapReduce jobs.
service.command.jt.heapsize.max=256
service.command.tt.heapsize.max=64
service.command.cldb.heapsize.max=256
service.command.mfs.heapsize.max=4000
service.command.webserver.heapsize.max=512
service.command.nfs.heapsize.max=64
service.command.os.heapsize.max=256
service.command.warden.heapsize.max=64
service.command.zk.heapsize.max=256
For MapReduce v2 configuration, edit the following files in addition to the above.
/opt/mapr/conf/conf.d/warden.resourcemanager.conf
service.heapsize.max=256
/opt/mapr/conf/conf.d/warden.nodemanager.conf
service.heapsize.max=64
/opt/mapr/conf/conf.d/warden.historyserver.conf
service.heapsize.max=64
After completing the steps above, run the following command on each node to restart services so as to reflect the changes.
# service mapr-warden restart
Extra tips
Login Screen Resolution Settings
When the machine starts up, the screen of the leftmost machine node1 will appear on the LDC, but it is a bit blurred because the resolution of the login screen is not identical to that of LCD. In order to adjust it, run the following command to check the connected monitor name. In this case, it is 'HDMI-1'.
# xrandr -q
Screen 0: minimum 320 x 200, current 1366 x 768, maximum 8192 x 8192
VGA-0 disconnected (normal left inverted right x axis y axis)
HDMI-0 disconnected (normal left inverted right x axis y axis)
DP-0 disconnected (normal left inverted right x axis y axis)
HDMI-1 connected 1366x768+0+0 (normal left inverted right x axis y axis) 460mm x 270mm
   1366x768       59.8*
   1024x768       75.1     70.1     60.0
   800x600        75.0     60.3
   640x480        75.0     60.0
DP-1 disconnected (normal left inverted right x axis y axis)
Then, edit '/etc/X11/xorg.conf.d/40-monitor.conf' as follows.
Section "Monitor"
 Identifier "HDMI-1"
 Option "PreferredMode" "1366x768"
EndSection
Auto Login
When doing a demo using this cluster, it is convenient if one can automatically login and move on from the login screen to the desktop screen without interaction. If you like, edit '/etc/gdm/custom.conf' as follows. In this case, an automatic login will be performed as the mapr user after waiting for user input for 30 seconds.
[daemon]
TimedLoginEnable=true
TimedLogin=mapr
TimedLoginDelay=30
Shutdown Via Power Button
When shutting down the portable cluster, it is convenient as well if one can power off the machines without entering a password or click a button for confirmation but just by pressing the power button on the top panel of the NUCs. Edit '/etc/polkit-1/localauthority.conf.d/org.freedesktop.logind.policy' as follows to enable it.
<?xml version="1.0" encoding="UTF-8"?>
<!DOCTYPE policyconfig PUBLIC
 "-//freedesktop//DTD PolicyKit Policy Configuration 1.0//EN"
 "http://www.freedesktop.org/standards/PolicyKit/1.0/policyconfig.dtd">
<policyconfig>
  <action id="org.freedesktop.login1.power-off-multiple-sessions">
    <description>Shutdown the system when multiple users are logged in</description>
    <message>System policy prevents shutting down the system when other users are logged in</message>
    <defaults>
      <allow_inactive>yes</allow_inactive>
      <allow_active>yes</allow_active>
    </defaults>
  </action>
</policyconfig>
